IOS
Simple Week Routine for macOS & iOS v1.2
09/04/2024 Filed in: Simple Week Routine
Version 1.2 is now available. This is a small update that adds the following feature:
- Added Setting to switch between Sun-Sat / Mon-Sun. For macOS, setting appears under the "Simple Week Routine" menu>Settings. For iOS the setting appears under the system Settings>Simple Week Routine.
- Added Setting to switch between Sun-Sat / Mon-Sun. For macOS, setting appears under the "Simple Week Routine" menu>Settings. For iOS the setting appears under the system Settings>Simple Week Routine.
How To Protect Photos Using Safe Swipe for iOS
02/26/2024 Filed in: Safe Swipe
I finished development on a new iOS app called Safe Swipe. The concept behind this app is, you pass another person your phone to look at photos and they inadvertently or advertently swipe through other photos that you didn't desire them to see. Safe Swipe solves that problem, by giving users the ability to choose specific photos to visually share. Photo selection is also locked behind biometrics/passcode. So others can only see the photos the device owner has selected.
Safe Swipe solves the problem of passing your phone to another and then they swipe through your photos. Photo selection is locked behind Face ID/passcode, so only photos users select are visible to others. They can swipe away without the worry of coming across an undesired photo.
1.) Startup app.
2.) Click "Choose Photos". Face ID approval may prompt.
3.) Enter Face ID/passcode.
4.) Tap photos to select. Click "Add".
5.) Photos are displayed.
6.) Tap a photo to open in Individual Photo Viewer.
7.) Ping Zoom to zoom-in. Tap-drag to pan.
8.) Double-tap to zoom back out to normal.
9.) Tap back arrow to return to photo grid-view.
10.) Click "X" button to clear photos from grid-view.
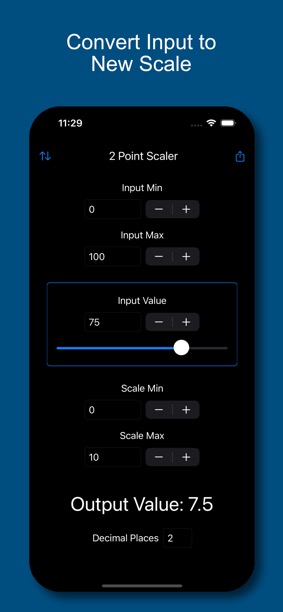
2 Point Scaler for iOS Now Available!
12/30/2023 Filed in: 2 Point Scaler

2 Point Scaler takes an input and converts it from one range to another scaled range. For example you could convert an input value from Celsius to Fahrenheit and view the converted output. Or convert an input value from a 4-20mA signal to a 0-50 psi value.
For conversion to work properly, minimum values should be less than maximum values for both input setpoints and scale setpoints.
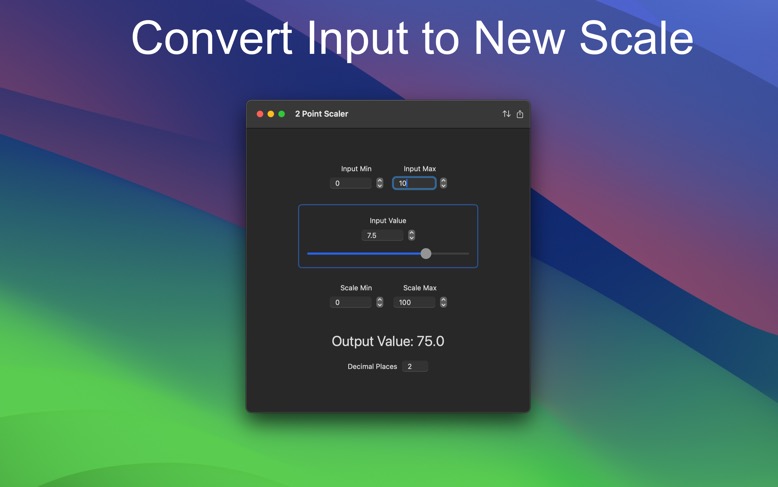
Working on a 2 Point Scaler App for macOS & iOS
12/17/2023 Filed in: 2 Point Scaler
I started development on a 2 Point Scaler app for macOS & iOS. The purpose of this app is to convert an input of a certain range to a new scale, then output the result. For example if you have an input that is a 4-20 mA sensor and you want to convert the input value from 0-50 psi. This app will produce the output value. Another example is converting Celsius to Fahrenheit, input min/max of 0-100 and scaling between 32-212.
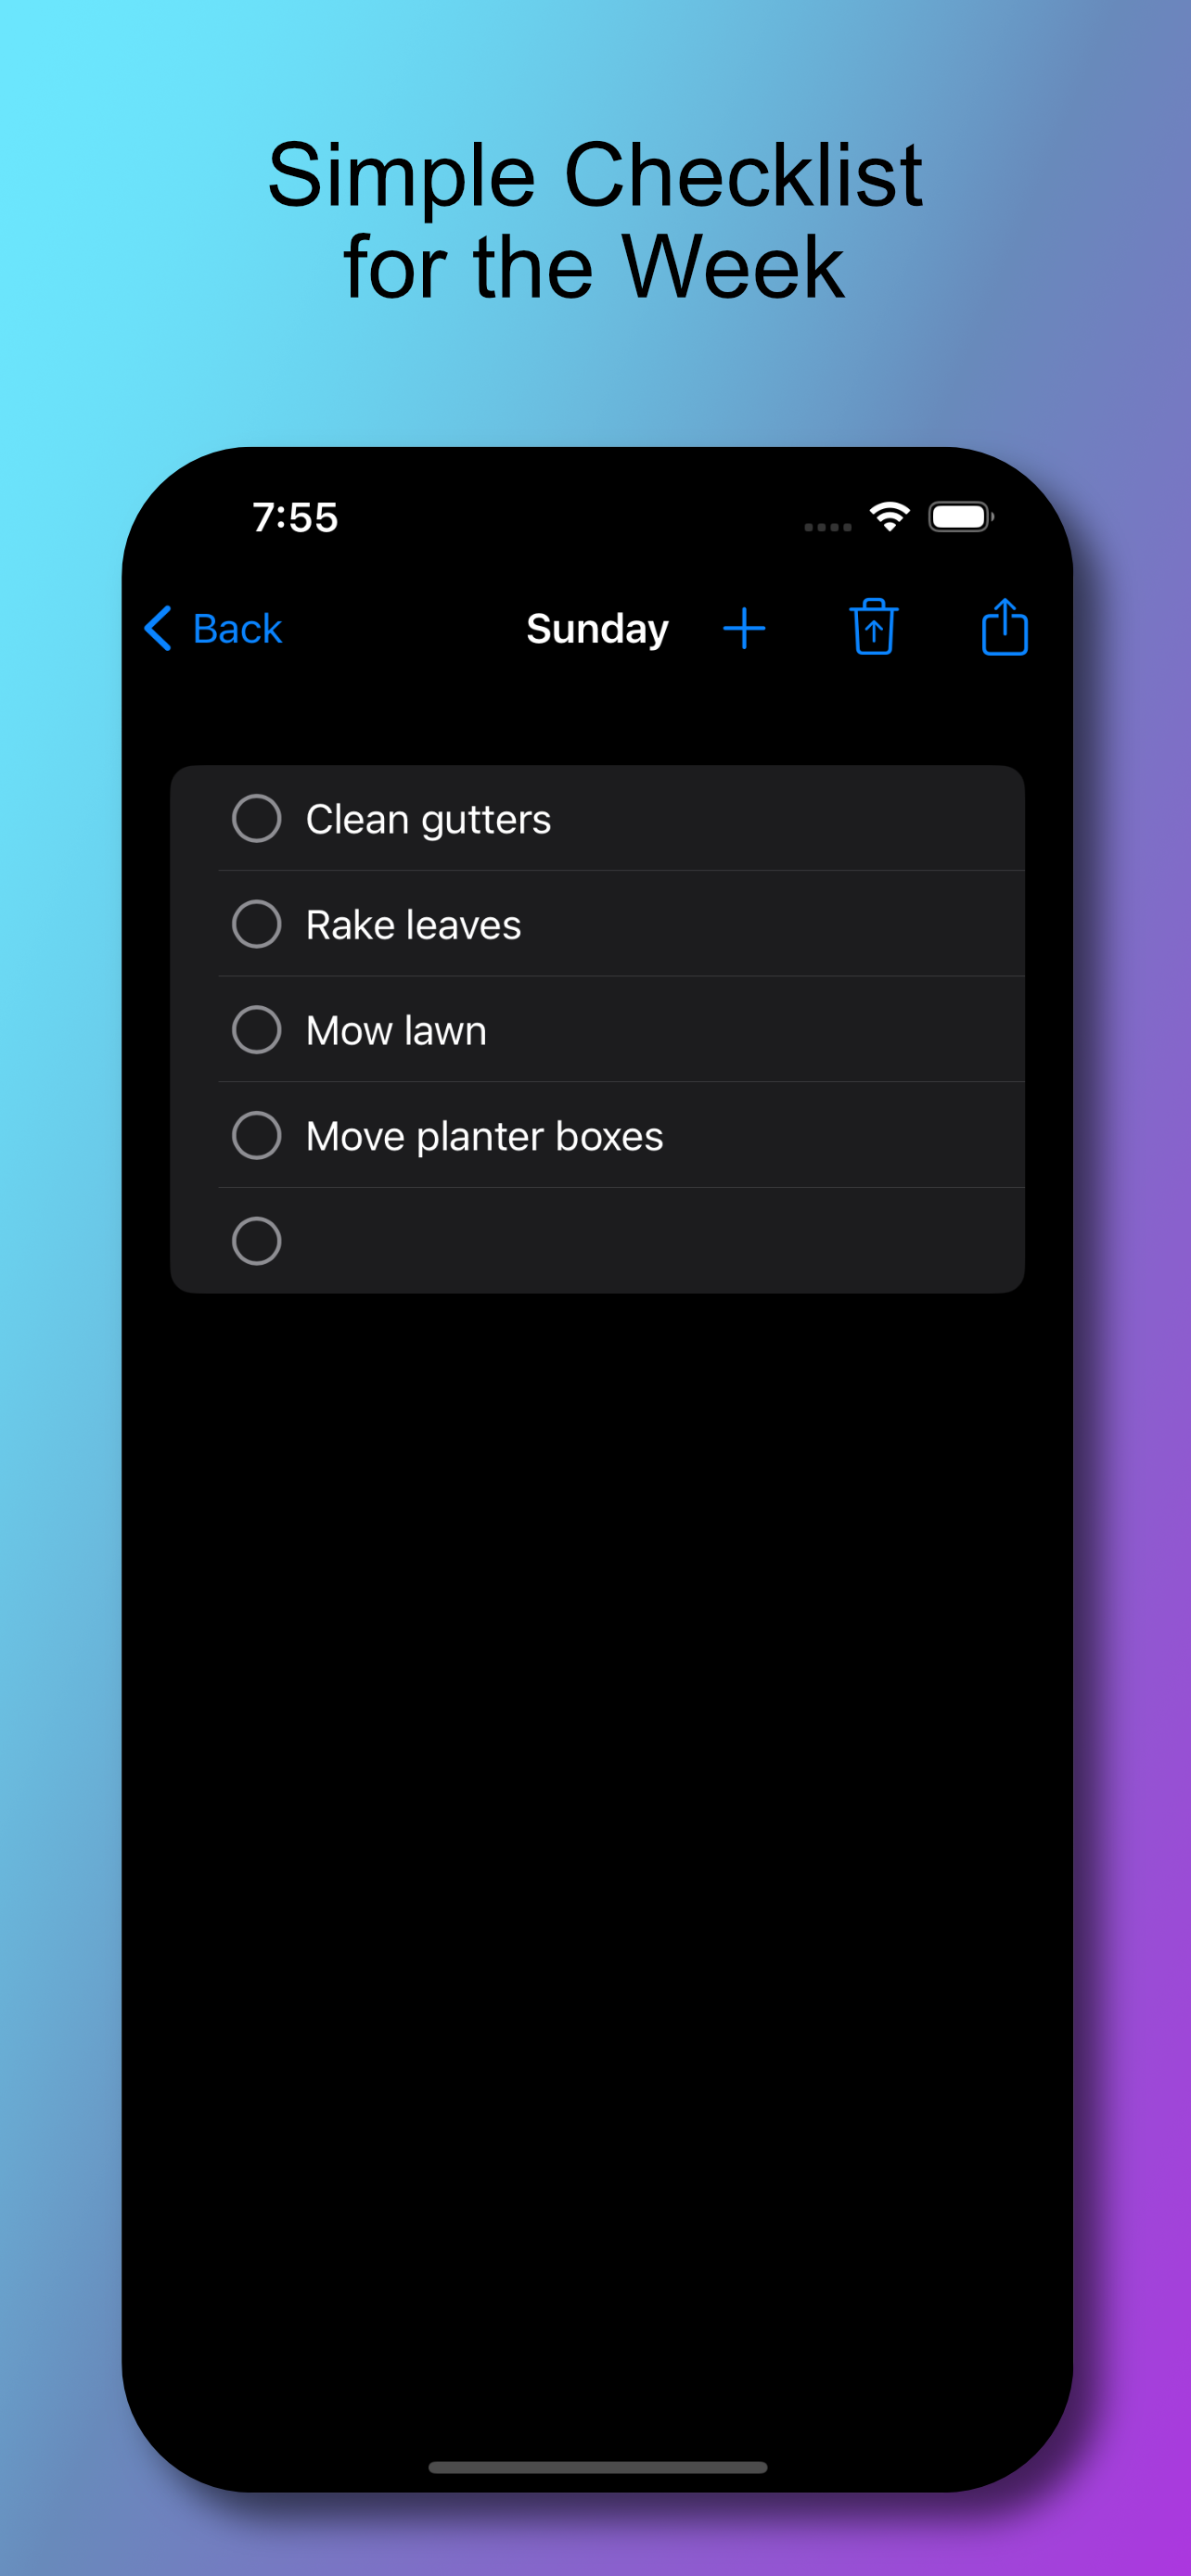
Create Checklists using Simple Week Checklist for iOS
12/05/2023 Filed in: Simple Week Checklist
Some tasks should be tracked simply. Use Simple Week Checklist to track weekly task status. At the start of a new week, clear checklists and start again. Simple Week Checklist makes simple work of everyday checklists, from work, to family to chores - track your simple tasks using Simple Week Checklist.
Simple Week Routine for iOS- Now Available!
11/12/2023 Filed in: Simple Week Routine
Wakeup and accomplish more with Simple Week Routine. An app designed specifically to quickly track your "Routine" progress throughout the week. Simple Week Routine allows for fast creation of routines and powerful tools for accomplishing your routine goals.
Sign-in to iCloud account for data to store to iCloud.
Instructions for App Operation:
1.) Click the + at the top of navigation to add a new Group.
2.) Enter in a Group Item Name.
3.) Select a color. The furthest left color (white/black) is the system primary color. Depending on light/dark mode, this color may appear different.
4.) Click Add button to create the new Group.
5.) Click the newly created Group. The main view will load with days of the week.
6.) In the Toolbar, toggle the S, M, etc… buttons to hide/show days of the week. This can be useful for focusing on specific days of the week. For iPhone, rotate to landscape to see buttons.
7.) Click the + button in the main view’s toolbar to add a new Routine.
8.) Enter in a Routine Item Name.
9.) Toggle the S, M, etc… days of the week toggle buttons. When creating a new Routine, it’ll be listed under whatever days of the week are toggle active (blue).
10.) Use the M-F link button to automatically activate the Monday-Friday toggle buttons.
11.) Set an appropriate Routine Start Time for when your Routine is to be accomplished.
12.) Click Add button to create the new Routine.
13.) New Routines are added to the main view’s days of the week.
14.) To mark a Routine as complete, check the Routine’s checkbox (square).
15.) To edit Routines, double-tap any Routine. This will load the editor, which is similar to the Add Routine prompt. For example if Tuesday was toggled on, toggling it again will turn it off and remove the Routine from that day of the week in the main view.
16.) Clicking the Delete Routine button in the editor will remove the Routine from all days of the week and from the app.
17.) In the main view toolbar, clicking the Clear Checkboxes button will uncheck all Routine’s checkboxes. This can be useful when starting a new week and you want to clear previous week’s progress.
18.) In the main view, swiping downward will reveal the Search field. Type in desired text content to filter the days of the week for Routines matching similar text by Routine Name.
19.) In the main view, double-tap a day of the week to toggle a UI focus on that day’s Routines. This can be helpful to further focus on content. Double-tap it again to return UI to normal.
20.) Tap-hold (force-touch) a day of the week’s name to see additional functions. Check All will check all Routines for that day of the week. Uncheck All works the same. Delete All Routines will remove Routines for that day of the week.
21.) Tap-hold (force-touch) options for a day of the week when using “All Groups” work a bit differently. The Check All function will apply to all Groups for that day of the week. Same for Uncheck All. Additionally when using All Groups and performing Tap-hold (force-touch) option Delete All Routines, it will remove all Routines for all Groups on that day of the week. Care should be taken when using these global functions as they can impact multiple items in one operation.
22.) Tap-hold (force-touch) a Group to Edit or Delete the Group. Editing allows for name and color change. Deleting a Group will also delete all of it’s Routines, so care should be taken when using.
That Text for iOS
03/15/2023 Filed in: That Text
That Text allows for quick data entry into text fields. Group text content into navigable entries to easily organize content. Click on a Nav Item to bring up previous text entries fast. Edit or reorder content using built-in context menus. Text entries can be shifted left/right to simulate a parent/child tree-like structure. A powerful Filter field allows for fast filtering of content. Filtering can be toggled between filtering by Text entry or Tree name.
Features:
- Editable navigation items.
- Stellar tree view to organize complex text lists.
- Great looking text fields that can be indented to form parent/child structures.
Instructions for app use:
1.) Launch app.
2.) Click + icon to create a new Navigation Item (Nav Item).
3.) Enter in a Nav Item name.
4.) Click newly created nav item.
5.) Main view loads. Click + icon in upper right to add new Tree Item. When pop up shows, enter a name.
6.) Click newly created Tree Item’s + icon. This creates Text fields for data entry.
7.) Type data into text fields. It auto saves content.
8.) Click move left/right arrows to adjust indent.
9.) Click ( - minus) icon to delete a text field. If text field has data, there will be a confirmation pop-up. If no data, the field is just removed.
10.) Tap-hold on text field's buttons to right for context options. For example tap-holding on minus (-) button will show more options.
10.1) Tap-hold options: Insert New Text Above/Below will insert a new text field either above current tap-hold location or below. Indentation of inserted items will match current indent of currently tap-hold item.
10.2) Reorder will show a pop-up view where user can drag/drop entries around in whichever desired order is wanted.
11.) Toolbar Reorder button will perform a similar task as the text field Reorder; although it will only show Tree items in list and they will be reordered to desired order.
12.) Toolbar chevrons for collapse all and expand all, this affects only Tree items under current Navigation item - unless using the "All Items" navigation, then all Tree Items for all Navigation Items will either expand or collapse.
13.) Tap-hold context options for Navigation items for editing Nav Item name, Reordering list, or deleting.
14.) Filter field at bottom left of main view - clicking the filter icon will cycle between either filtering by Text data or by Tree Item name. Toggle icon to appropriate choice and type into filter field. Data is dynamically filtered. Be sure to clear the filter when complete - changing to another Navigation item keeps the Filter text and will still actively attempt to filter content.
Use Examples:
-Document computer configuration
-Create notes regarding topics of interest
-Record information regarding work tasks.
That Checklist for iOS Update v1.2
03/12/2023 Filed in: That Text
That Checklist v1.2 is now available on the iOS App Store. This versions brings several updates, including:
That Checklist for iOS
03/04/2023 Filed in: That Checklist
That Checklist allows for quick data entry into text fields and mark-off of checkboxes. Group checklists content into navigable entries to easily organize content. Click on a Nav Item to bring up previous checklists fast. Edit or reorder content using built-in context menus. Checklists can be shifted left/right to simulate a parent/child tree-like structure. A powerful Filter field allows for fast filtering of content. Filtering can be toggled between filtering by checklist text entry or Tree name.
Features:
- Editable navigation items.
- Stellar tree view to organize complex checklists.
- Great looking checklists that can be indented to form parent/child structures.
Instructions for app use:
1.) Launch app.
2.) Click + icon to create a new Navigation Item (Nav Item).
3.) Enter in a Nav Item name.
4.) Click newly created nav item.
5.) Main view loads. Click + icon in upper right to add new Tree Item. When pop up shows, enter a name.
6.) Click newly created Tree Item’s + icon. This creates checklist for data entry.
7.) Type data into text fields. It auto saves content. Click the checkbox to check-off items like a checklist.
8.) Click move left/right arrows to adjust indent.
9.) Click ( - minus) icon to delete a checklist. If text field has data, there will be a confirmation pop-up. If no data, the field is just removed.
10.) Tap-hold on checklist checkbox or the buttons to right for context options. For example tap-holding on minus (-) button will show more options.
10.1) Tap-hold options: Insert New Text Above/Below will insert a new checklist either above current tap-hold location or below. Indentation of inserted items will match current indent of currently tap-hold item.
10.2) Reorder will show a pop-up view where user can drag/drop entries around in whichever desired order is wanted.
11.) Toolbar Reorder button will perform a similar task as the checklist Reorder; although it will only show Tree items in list and they will be reordered to desired order.
12.) Toolbar chevrons for collapse all and expand all, this affects only Tree items under current Navigation item - unless using the "All Items" navigation, then all Tree Items for all Navigation Items will either expand or collapse.
13.) Tap-hold context options for Navigation items for editing Nav Item name, Reordering list, or deleting.
14.) Filter field at bottom left of main view - clicking the filter icon will cycle between either filtering by Text data or by Tree Item name. Toggle icon to appropriate choice and type into filter field. Data is dynamically filtered. Be sure to clear the filter when complete - changing to another Navigation item keeps the Filter text and will still actively attempt to filter content.
Use Examples:
-Verify the packing of camping supplies.
-Create to do lists for chores.
-List out your reminders.
-Document completion of work tasks.
How to Make a SwiftUI List Scroll Automatically
01/22/2023
How to Make a SwiftUI List Scroll Automatically. Using Apple Xcode for macOS.
macOS: v13.1
Xcode v14.2
Swift: v5
iOS: v14.2
macOS: v13.1
Xcode v14.2
Swift: v5
iOS: v14.2
Compare 2 Text for iOS
10/18/2022 Filed in: Compare 2 Text
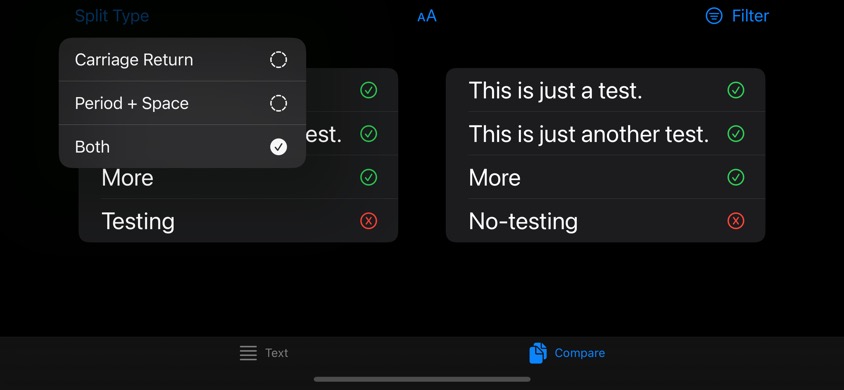
Finished development on Compare 2 Text for iOS. This app compares two paragraphs of text to each other and flags sentences containing differences.
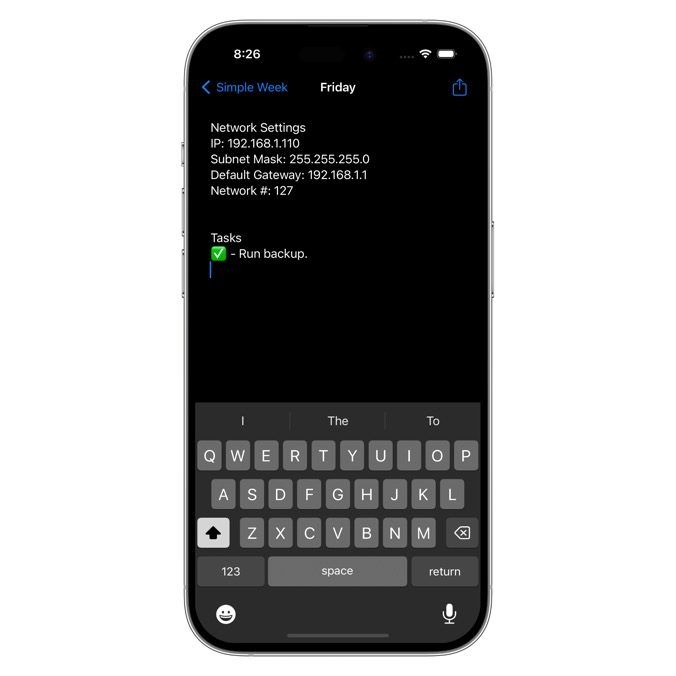
Simple Week for iOS
11/11/2022 Filed in: Simple Week
Finished development on iOS version of Simple Week. I use this app to quickly write down notes throughout the week. This works out great when I don't have time to organize the notes, but just need to get it recorded. I can later transfer the notes to Apple's Notes app which is meant for more permanent note taking. Simple Week works great for temporary notes or data needed on a certain day of the week.