March 2023
How to Compare Images for macOS Using Compare 2 Image
03/21/2023 Filed in: Compare 2 Image

Compare images in directory or compare multiple directories using include subfolders toggle button. Comparison can be made by name, date modified, size, data, or all of the above to quickly identify images that are different. Further highlight images with a difference using built-in fast filter options for the display of all results, just matches, or non-matches. Images that don’t have a match will have a mark identifying them as a non-match. Ability to hide/show properties for date modified and size. Use the Include Subfolders option to list all images; including images nested inside other folders. Care should be taken using the subfolders option, as the processing time for comparison will be much longer for large lists.
Features:
- Compare images quickly.
- Images nested in subfolders can be compared.
- Multiple comparison methods; by name, date, size, and data.
- Preview images.
- Launch images in default app.
Here are instructions for app operation:
1.) Launch app.
2.) Click button for Set Directory 1. Choose a directory for comparison. Directory should include images.
3.) Click button for Set Directory 2. Choose a directory for comparison. Directory should include images.
4.) The left/right lists will update to show images and a comparison status green/red checkmark/x to indicate comparison results. A green checkmark indicates the item appeared in the other list. An X indicates no match was found for selected comparison parameter.
5.) Toggle toolbar buttons appropriately.
6.) Change 'Comparing' toolbar selection for desired comparison. E.g. choosing 'Name' will compare image names between the two lists.
7.) Change 'Filter' for desired filtered result for Lists.
8.) Double-click a list's image to see an image preview.
9.) Right-click a list's image to see 'Open' to launch the item.
10.) Right-click pathbar along bottom to see 'Open' to open the path location in Finder.
Use Examples:
- Compare images on local disk to a backup directory on another disk.
- Confirm images have been copied to a location by a specific date.
- Determine image sizes for directories.
- See all images from a root folder through all subfolders.
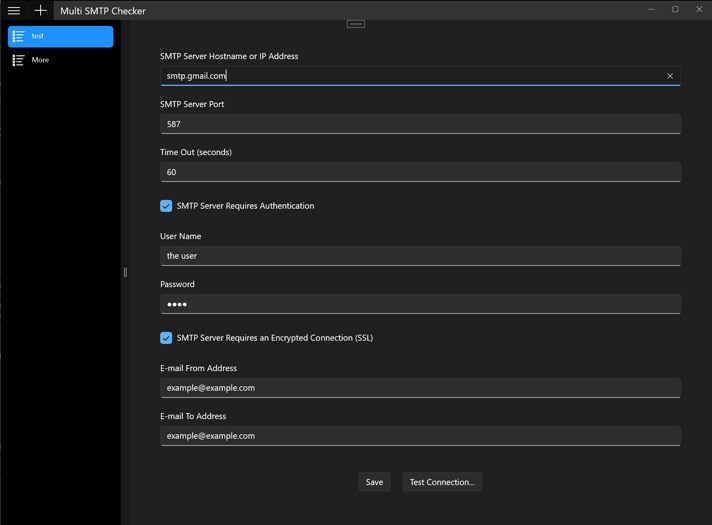
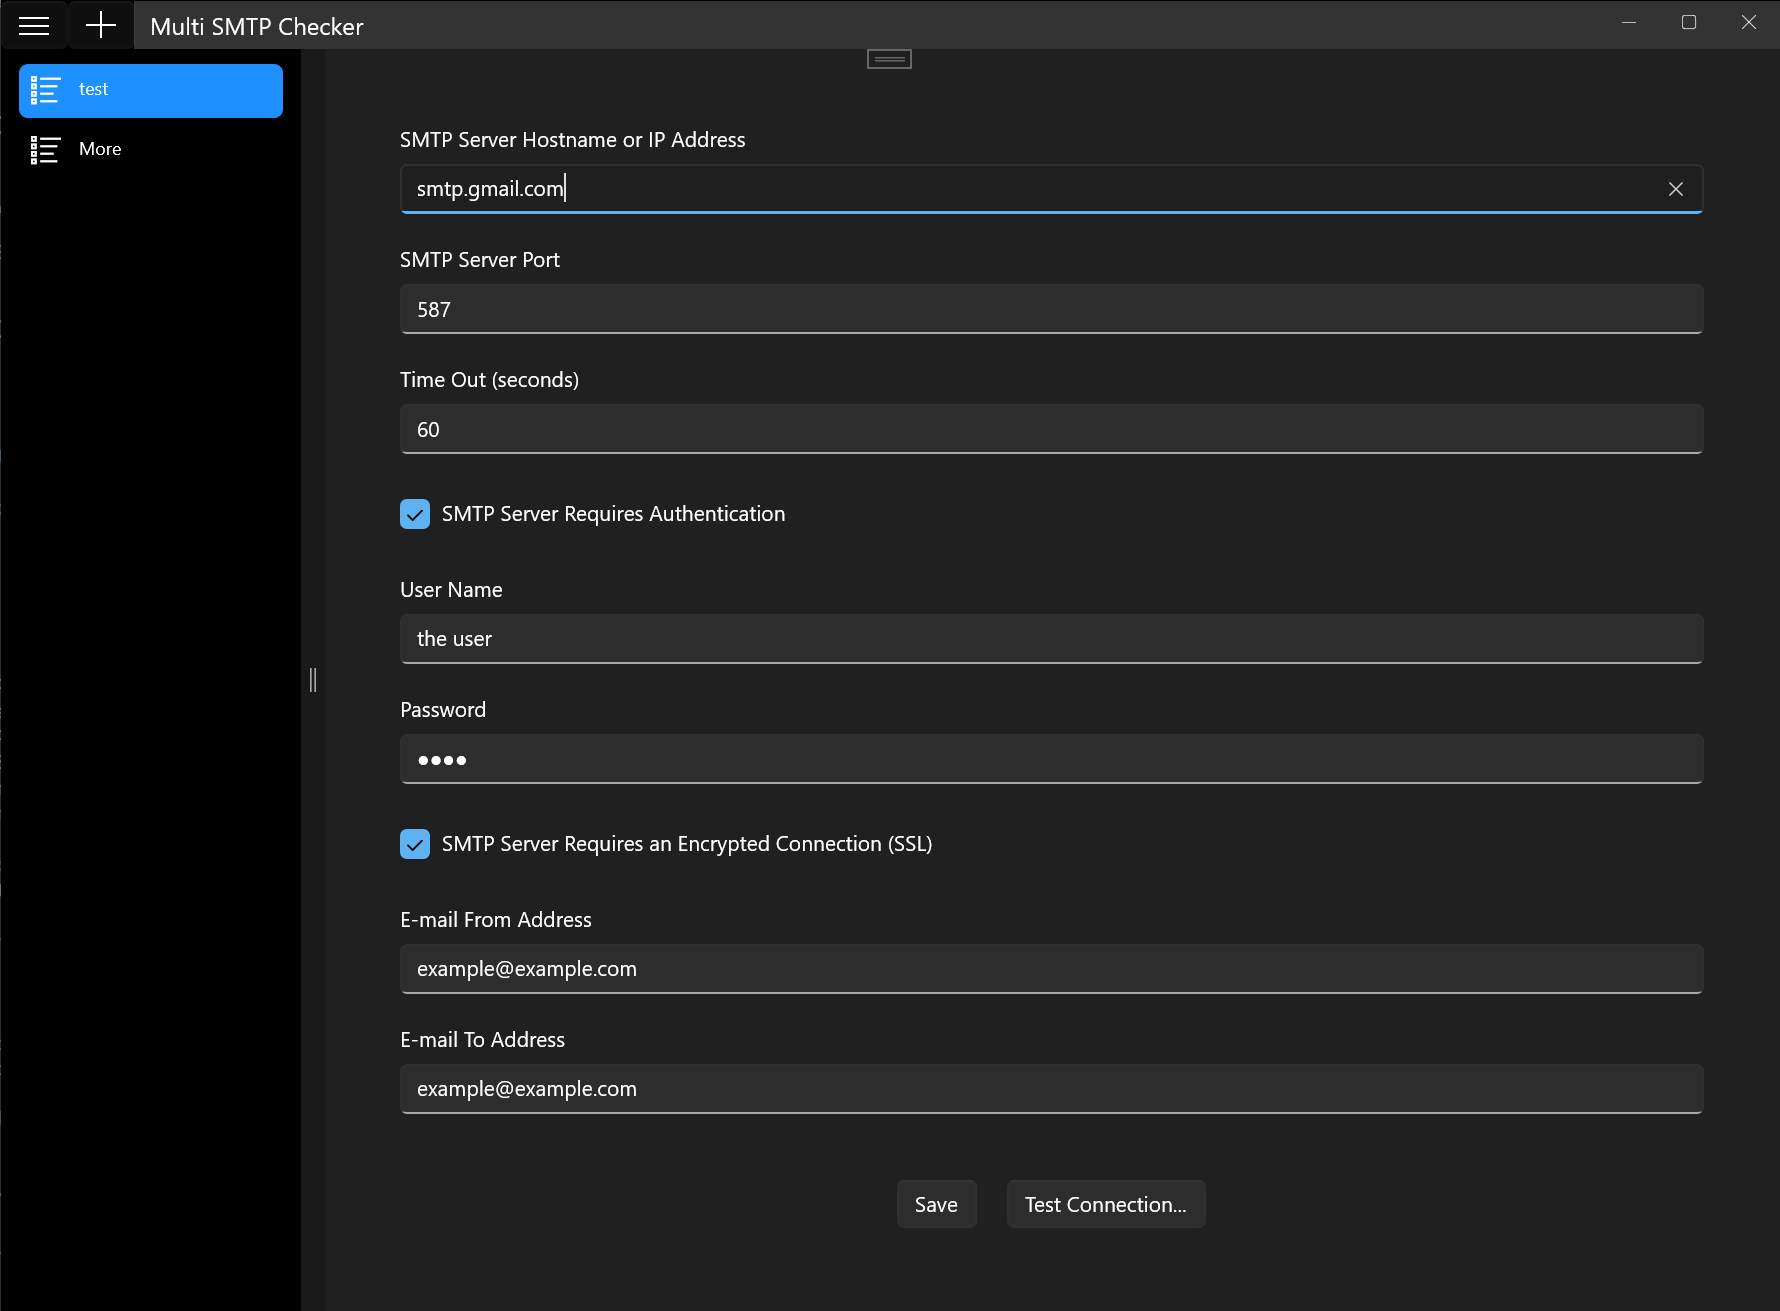
Test Multiple SMTP Connections using Multi SMTP Checker
03/19/2023 Filed in: Multi SMTP Checker
Use Multi SMTP Checker to send a test e-mail to a recipient. SMTP stands for Simple Mail Transfer Protocol and can be used to send e-mails leveraging an SMTP provider. There are many SMTP providers available, several well known online search engines can provide them.
Enter in appropriate SMTP configuration and click Test Connection to test. If test completes successfully, a successful message prompt is seen and e-mail recipient will receive test e-mail. Multi SMTP Checker supports saving multiple Nav Items, think of them as profiles. This allows users to store multiple SMTP configuration for reference and testing.
Enter in appropriate SMTP configuration and click Test Connection to test. If test completes successfully, a successful message prompt is seen and e-mail recipient will receive test e-mail. Multi SMTP Checker supports saving multiple Nav Items, think of them as profiles. This allows users to store multiple SMTP configuration for reference and testing.
Clipboard History Manager for macOS - Floating Clipboard
03/16/2023 Filed in: Floating Clipboard
Use this app to take screenshots of content, then store them in the Floating Clipboard window. Now you can zoom in and focus on details using the built-in image viewer. Since Floating Clipboard floats above other apps and windows, the app can be tucked into a Desktop corner and you can still reference the content with ease.
Also use this app to copy text and do similar operations like images. The built-in text editor has a 'Virtual Line' function to draw focus to desired content.
Finally, there is a built-in URL viewer to view pasted URL content from the web (with limited functions).
Features:
-Clipboard history.
-Auto fetching of clipboard contents (optional).
-Float Window above other apps & windows (optional).
-Fast & fluid type-based filtering.
-Inserted content management.
-Editable text.
-Image Viewer with simple mouse-scroll zoom.
-URL Viewer for webpage viewing.
-Built-in Help Topics.
Instructions for Operation:
1.) Launch app.
2.) Optionally choose Auto Clipboard - used to automatically fetch clipboard contents (if image, text, or URL) and inserts into Floating Clipboard.
3.) Optionally choose Float Window - used to keep Floating Clipboard app UI above other apps & windows.
4.) Elsewhere in system copy image, text, or URL content via traditional means (e.g. use macOS screenshot command to take a snapshot).
5.) Once desired content is copied to system clipboard, use the Paste button in Floating Clipboard to insert the content. Or, if Auto Clipboard function is enabled, content will automatically be inserted without having to click Paste button.
6.) Repeat for other images, text, or URL if desired.
7.) Double-click an image, text, or URL inside Floating Clipboard to open either an editor/viewer (depending on clicked item).
8.) If double-clicking an Image item - an Image Viewer pop-up will show. If NOT using the optional 'VIew as PDF' mode, mouse-scroll will zoom in/out on image. Left-clicking + dragging will 'pan' image around. If using the 'View as PDF' mode active, zoom can be done by using shortcut command CMD & +/-. There are traditional right-click functions for PDF options too.
9.) If double-clicking a Text item - a Text Editor pop-up will show. Users can edit the text and click 'Complete' button to save changes. Or 'Cancel' button to discard changes. An optional 'Virtual Line' function is available to use as a mark to allow easier focusing on text content. The line can be moved up/down by left-clicking + dragging.
10.) If double-clicking a URL item - a URL viewer pop-up will show. Typical BUT limited browser operation can be achieved.
11.) Use the trash icon, Delete button in toolbar to Delete All items in grid view.
12.) Filtering can be achieved by clicking the 'All' link-button next to the filter icon. Filter for Image, Text, or URL can be performed. The filter link-button will cycle through the types and then loop back to 'All' to show all possible results.
Examples of Use:
-I use this app to screenshot content from other Mission Control screens and paste it into Floating Clipboard so I can zoom in on the data. With the window floating I can tuck it off to the side and still work on other tasks. Optionally Floating Clipboard (any app for that matter) can be set to appear on other Mission Control screens by right-clicking app's dock icon - Options - Assign to - "All Desktops".
That Text for Windows
03/15/2023 Filed in: That Text

That Text allows for quick data entry into text fields. Group text content into navigable entries to easily organize content. Click on a Nav Item to bring up previous text entries fast. Edit or reorder content using built-in context menus. Text entries can be shifted left/right to simulate a parent/child tree-like structure. A powerful Filter field allows for fast filtering of content. Filtering can be toggled between filtering by Text entry or Tree name.
Features:
- Editable navigation items.
- Stellar tree view to organize complex text lists.
- Great looking text fields that can be indented to form parent/child structures.
Instructions for app use:
1.) Launch app.
2.) Click + icon to create a new Navigation Item (Nav Item).
3.) Enter in a Nav Item name.
4.) Click newly created nav item.
5.) Main view loads. Click + icon in upper right to add new Tree Item. When pop up shows, enter a name.
6.) Click newly created Tree Item’s + icon. This creates Text fields for data entry.
7.) Type data into text fields. It auto saves content.
8.) Click move left/right arrows to adjust indent.
9.) Click ( - minus) icon to delete a text field. If text field has data, there will be a confirmation pop-up. If no data, the field is just removed.
10.) Right click on text field's buttons to see context options. For example right-clicking on minus (-) button will show more options.
10.1) Right-click options: Insert New Text Above/Below will insert a new text field either above current right-click location or below. Indentation of inserted items will match current indent of currently right-click item.
10.2) Reorder will show a pop-up view where user can drag/drop entries around in whichever desired order is wanted.
11.) Toolbar Reorder button will perform a similar task as the text field Reorder; although it will only show Tree items in list and they will be reordered to desired order.
12.) Toolbar chevrons for collapse all and expand all, this affects only Tree items under current Navigation item - unless using the "All Items" navigation, then all Tree Items for all Navigation Items will either expand or collapse.
13.) Right-click context options for Navigation items for editing Nav Item name, Reordering list, or deleting.
14.) Filter field at bottom left of main view - clicking the filter icon will cycle between either filtering by Text data or by Tree Item name. Toggle icon to appropriate choice and type into filter field. Data is dynamically filtered. Be sure to clear the filter when complete - changing to another Navigation item keeps the Filter text and will still actively attempt to filter content.
15.) Max Height slider affects only Text fields that have a lot of text content in them (usually a few rows of text). Changing the Max Height slider will "cap" the text content to specified height, triggering the vertical scrollbar to become active.
Use Examples:
-Document computer configuration
-Create notes regarding topics of interest
-List out your reminders.
-Record information regarding work tasks.
That Text for iOS
03/15/2023 Filed in: That Text
That Text allows for quick data entry into text fields. Group text content into navigable entries to easily organize content. Click on a Nav Item to bring up previous text entries fast. Edit or reorder content using built-in context menus. Text entries can be shifted left/right to simulate a parent/child tree-like structure. A powerful Filter field allows for fast filtering of content. Filtering can be toggled between filtering by Text entry or Tree name.
Features:
- Editable navigation items.
- Stellar tree view to organize complex text lists.
- Great looking text fields that can be indented to form parent/child structures.
Instructions for app use:
1.) Launch app.
2.) Click + icon to create a new Navigation Item (Nav Item).
3.) Enter in a Nav Item name.
4.) Click newly created nav item.
5.) Main view loads. Click + icon in upper right to add new Tree Item. When pop up shows, enter a name.
6.) Click newly created Tree Item’s + icon. This creates Text fields for data entry.
7.) Type data into text fields. It auto saves content.
8.) Click move left/right arrows to adjust indent.
9.) Click ( - minus) icon to delete a text field. If text field has data, there will be a confirmation pop-up. If no data, the field is just removed.
10.) Tap-hold on text field's buttons to right for context options. For example tap-holding on minus (-) button will show more options.
10.1) Tap-hold options: Insert New Text Above/Below will insert a new text field either above current tap-hold location or below. Indentation of inserted items will match current indent of currently tap-hold item.
10.2) Reorder will show a pop-up view where user can drag/drop entries around in whichever desired order is wanted.
11.) Toolbar Reorder button will perform a similar task as the text field Reorder; although it will only show Tree items in list and they will be reordered to desired order.
12.) Toolbar chevrons for collapse all and expand all, this affects only Tree items under current Navigation item - unless using the "All Items" navigation, then all Tree Items for all Navigation Items will either expand or collapse.
13.) Tap-hold context options for Navigation items for editing Nav Item name, Reordering list, or deleting.
14.) Filter field at bottom left of main view - clicking the filter icon will cycle between either filtering by Text data or by Tree Item name. Toggle icon to appropriate choice and type into filter field. Data is dynamically filtered. Be sure to clear the filter when complete - changing to another Navigation item keeps the Filter text and will still actively attempt to filter content.
Use Examples:
-Document computer configuration
-Create notes regarding topics of interest
-Record information regarding work tasks.
That Text for macOS
03/15/2023 Filed in: That Text
That Text allows for quick data entry into text fields. Group text content into navigable entries to easily organize content. Click on a Nav Item to bring up previous text entries fast. Edit or reorder content using built-in context menus. Text entries can be shifted left/right to simulate a parent/child tree-like structure. A powerful Filter field allows for fast filtering of content. Filtering can be toggled between filtering by Text entry or Tree name.
Features:
- Editable navigation items.
- Stellar tree view to organize complex checklists.
- Great looking text fields that can be indented to form parent/child structures.
Instructions for app use:
1.) Launch app.
2.) Click + icon to create a new Navigation Item (Nav Item).
3.) Enter in a Nav Item name.
4.) Click newly created nav item.
5.) Main view loads. Click + icon in upper right to add new Tree Item. When pop up shows, enter a name.
6.) Click newly created Tree Item’s + icon. This creates Text fields for data entry.
7.) Type data into text fields. It auto saves content.
8.) Click move left/right arrows to adjust indent.
9.) Click ( - minus) icon to delete a text field. If text field has data, there will be a confirmation pop-up. If no data, the field is just removed.
10.) Right click on text field's buttons to right for context options. For example right-clicking on minus (-) button will show more options.
10.1) Right-click options: Insert New Text Above/Below will insert a new text field either above current right-click location or below. Indentation of inserted items will match current indent of currently right-click item.
10.2) Reorder will show a pop-up view where user can drag/drop entries around in whichever desired order is wanted.
11.) Toolbar Reorder button will perform a similar task as the text field Reorder; although it will only show Tree items in list and they will be reordered to desired order.
12.) Toolbar chevrons for collapse all and expand all, this affects only Tree items under current Navigation item - unless using the "All Items" navigation, then all Tree Items for all Navigation Items will either expand or collapse.
13.) Right-click context options for Navigation items for editing Nav Item name, Reordering list, or deleting.
14.) Filter field at bottom left of main view - clicking the filter icon will cycle between either filtering by Text data or by Tree Item name. Toggle icon to appropriate choice and type into filter field. Data is dynamically filtered. Be sure to clear the filter when complete - changing to another Navigation item keeps the Filter text and will still actively attempt to filter content.
15.) Max Height slider affects only Text fields that have a lot of text content in them (usually a few rows of text). Changing the Max Height slider will "cap" the text content to specified height, triggering the vertical scrollbar to become active.
Use Examples:
-Document computer configuration
-Create notes regarding topics of interest
-List out your reminders.
-Record information regarding work tasks.
That Checklist for iOS Update v1.2
03/12/2023 Filed in: That Text
That Checklist v1.2 is now available on the iOS App Store. This versions brings several updates, including:
Multi SMTP Checker in Development
03/11/2023 Filed in: Multi SMTP Checker
I started working on an SMTP Checker that supports 'multiple' saved profiles. I needed something like this for my day job to store different customer sites' SMTP information in a ready to go app for SMTP operation testing.
SMTP Checker for Windows
03/11/2023 Filed in: SMTP Checker
Finished development on SMTP Checker for Windows. It is now available via the Microsoft App Store.
Use SMTP Checker to send a test e-mail to a recipient. SMTP stands for Simple Mail Transfer Protocol and can be used to send e-mails leveraging an SMTP provider. There are many SMTP providers available, several well known online search engines can provide them.
Enter in appropriate SMTP configuration and click Test Connection to test. If test completes successfully, a successful message prompt is seen and e-mail recipient will receive test e-mail.
That Checklist for iOS
03/04/2023 Filed in: That Checklist
That Checklist allows for quick data entry into text fields and mark-off of checkboxes. Group checklists content into navigable entries to easily organize content. Click on a Nav Item to bring up previous checklists fast. Edit or reorder content using built-in context menus. Checklists can be shifted left/right to simulate a parent/child tree-like structure. A powerful Filter field allows for fast filtering of content. Filtering can be toggled between filtering by checklist text entry or Tree name.
Features:
- Editable navigation items.
- Stellar tree view to organize complex checklists.
- Great looking checklists that can be indented to form parent/child structures.
Instructions for app use:
1.) Launch app.
2.) Click + icon to create a new Navigation Item (Nav Item).
3.) Enter in a Nav Item name.
4.) Click newly created nav item.
5.) Main view loads. Click + icon in upper right to add new Tree Item. When pop up shows, enter a name.
6.) Click newly created Tree Item’s + icon. This creates checklist for data entry.
7.) Type data into text fields. It auto saves content. Click the checkbox to check-off items like a checklist.
8.) Click move left/right arrows to adjust indent.
9.) Click ( - minus) icon to delete a checklist. If text field has data, there will be a confirmation pop-up. If no data, the field is just removed.
10.) Tap-hold on checklist checkbox or the buttons to right for context options. For example tap-holding on minus (-) button will show more options.
10.1) Tap-hold options: Insert New Text Above/Below will insert a new checklist either above current tap-hold location or below. Indentation of inserted items will match current indent of currently tap-hold item.
10.2) Reorder will show a pop-up view where user can drag/drop entries around in whichever desired order is wanted.
11.) Toolbar Reorder button will perform a similar task as the checklist Reorder; although it will only show Tree items in list and they will be reordered to desired order.
12.) Toolbar chevrons for collapse all and expand all, this affects only Tree items under current Navigation item - unless using the "All Items" navigation, then all Tree Items for all Navigation Items will either expand or collapse.
13.) Tap-hold context options for Navigation items for editing Nav Item name, Reordering list, or deleting.
14.) Filter field at bottom left of main view - clicking the filter icon will cycle between either filtering by Text data or by Tree Item name. Toggle icon to appropriate choice and type into filter field. Data is dynamically filtered. Be sure to clear the filter when complete - changing to another Navigation item keeps the Filter text and will still actively attempt to filter content.
Use Examples:
-Verify the packing of camping supplies.
-Create to do lists for chores.
-List out your reminders.
-Document completion of work tasks.
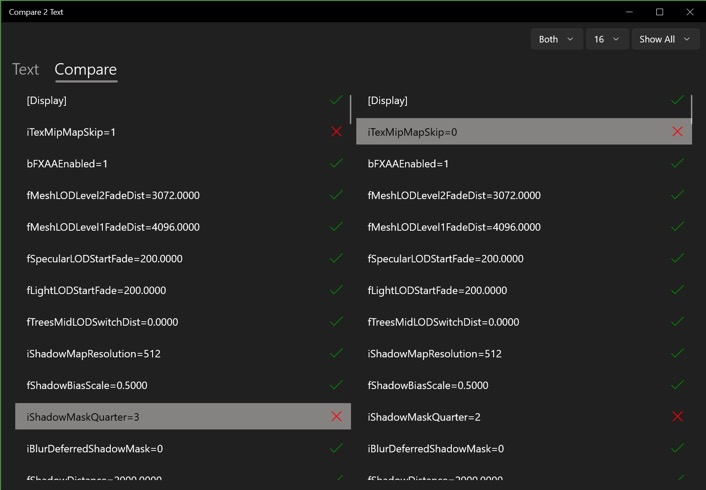
How to Compare Text in Windows
03/04/2023 Filed in: Compare 2 Text
Use Compare 2 Text to perform fast comparisons between two bodies of text. See results in an easy to understand list. Use powerful filtering options to quickly focus on differences.