October 2023
Simple Week Routine for macOS- Now Available!
10/31/2023 Filed in: Simple Week Routine

Wakeup and accomplish more with Simple Week Routine. An app designed specifically to quickly track your "Routine" progress throughout the week. Simple Week Routine allows for fast creation of routines and powerful tools for accomplishing your routine goals.
Instructions for App Operation:
1.) Click the + at the top of navigation to add a new Group.
2.) Enter in a Group Item Name.
3.) Select a color. The furthest left color (white/black) is the system primary color. Depending on light/dark mode, this color may appear different.
4.) Click Add button to create the new Group.
5.) Click the newly created Group. The main view will load with days of the week.
6.) In the Toolbar, toggle the S, M, etc… buttons to hide/show days of the week. This can be useful for focusing on specific days of the week.
7.) Click the + button in the main view’s toolbar to add a new Routine.
8.) Enter in a Routine Item Name.
9.) Toggle the S, M, etc… days of the week toggle buttons. When creating a new Routine, it’ll be listed under whatever days of the week are toggle active (blue).
10.) Use the M-F link button to automatically activate the Monday-Friday toggle buttons.
11.) Set an appropriate Routine Start Time for when your Routine is to be accomplished.
12.) Click Add button to create the new Routine.
13.) New Routines are added to the main view’s days of the week.
14.) To mark a Routine as complete, check the Routine’s checkbox (square).
15.) To edit Routines, double-click any Routine. This will load the editor, which is similar to the Add Routine prompt. For example if Tuesday was toggled on, toggling it again will turn it off and remove the Routine from that day of the week in the main view.
16.) Clicking the Delete Routine button in the editor will remove the Routine from all days of the week and from the app.
17.) In the main view toolbar, clicking the Clear Checkboxes button will uncheck all Routine’s checkboxes. This can be useful when starting a new week and you want to clear previous week’s progress.
18.) Click the Search field in the toolbar and type in desired text content to filter the days of the week for Routines matching similar text by Routine Name.
19.) In the main view, double-click a day of the week to toggle a UI focus on that day’s Routines. This can be helpful to further focus on content. Double-click it again to return UI to normal.
20.) Right-click a day of the week’s name to see additional functions. Check All will check all Routines for that day of the week. Uncheck All works the same. Delete All Routines will remove Routines for that day of the week.
21.) Right-click options for a day of the week when using “All Groups” work a bit differently. The Check All function will apply to all Groups for that day of the week. Same for Uncheck All. Additionally when using All Groups and performing right-click option Delete All Routines, it will remove all Routines for all Groups on that day of the week. Care should be taken when using these global functions as they can impact multiple items in one operation.
22.) Right-click a Group to Edit or Delete the Group. Editing allows for name and color change. Deleting a Group will also delete all of it’s Routines, so care should be taken when using.
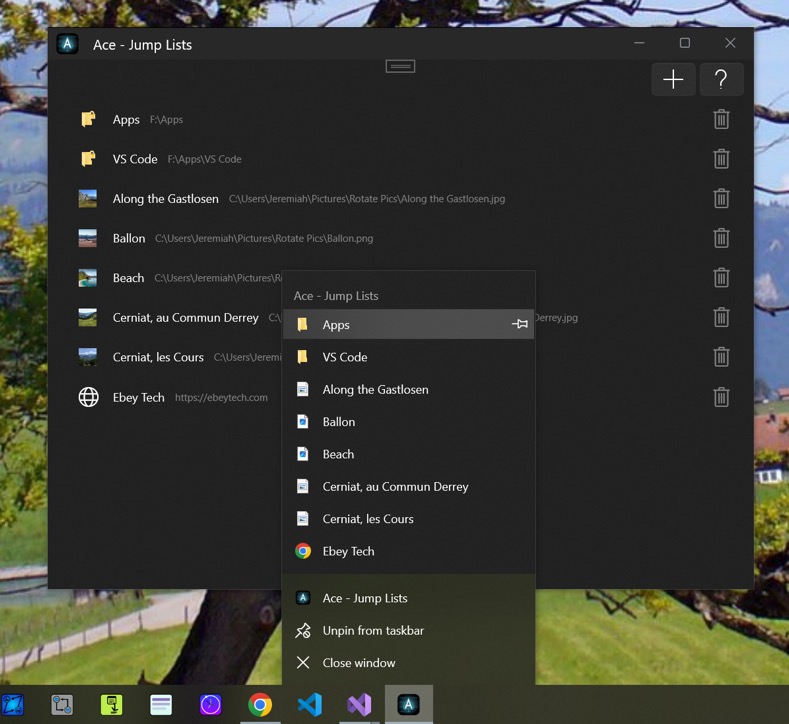
Ace - Jump Lists for Windows in Development
10/28/2023 Filed in: Ace - Jump Lists
I started working on a Windows version of Ace - Jump Lists. It will fashion very similar to its macOS version.
Features:
The app will likely take several more weeks to finish development on. There are some specific Jump Item operations built-in to Windows that I am testing further.
Example screenshot:
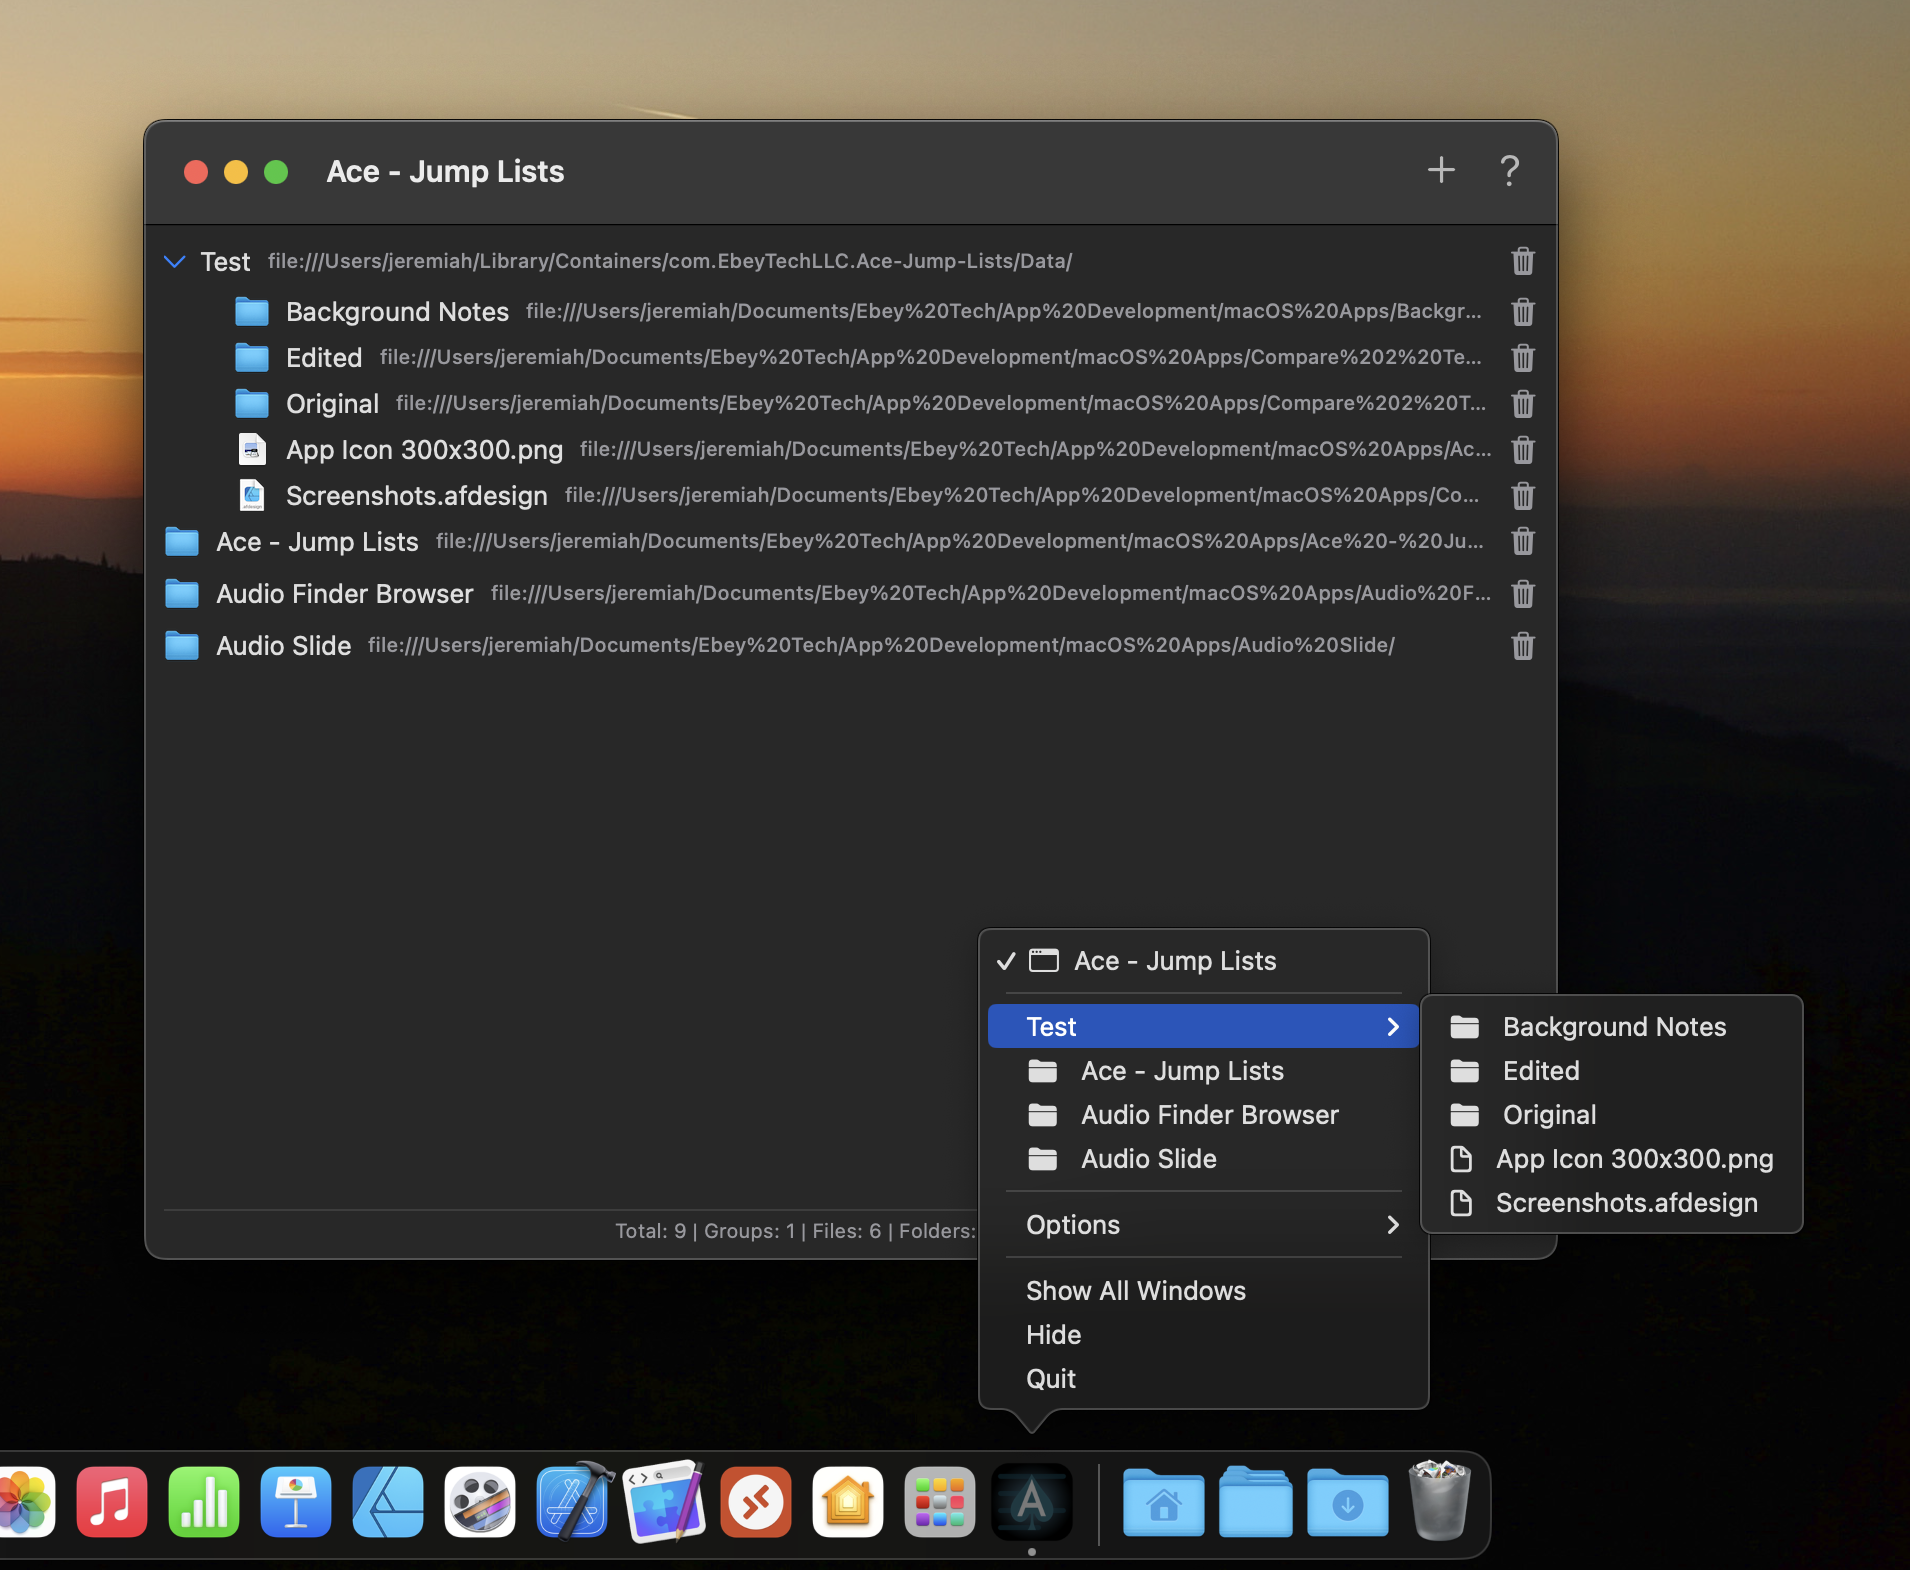
macOS version for comparison:
Features:
- Main app window
- List of Jump Items.
- Ability to add and delete Jump Items.
- Ability to add Files, Folders, and URLs. No Group support like in the macOS version.
- Ability to right-click Taskbar and launch Files, Folders, and URLs.
The app will likely take several more weeks to finish development on. There are some specific Jump Item operations built-in to Windows that I am testing further.
Example screenshot:
macOS version for comparison:
Compare 2 Text for macOS Update v1.4
10/28/2023 Filed in: Compare 2 Text
Updated Compare 2 Text for macOS to v1.4.
-Updated Export message.
-Updated App Preview and Screenshots.
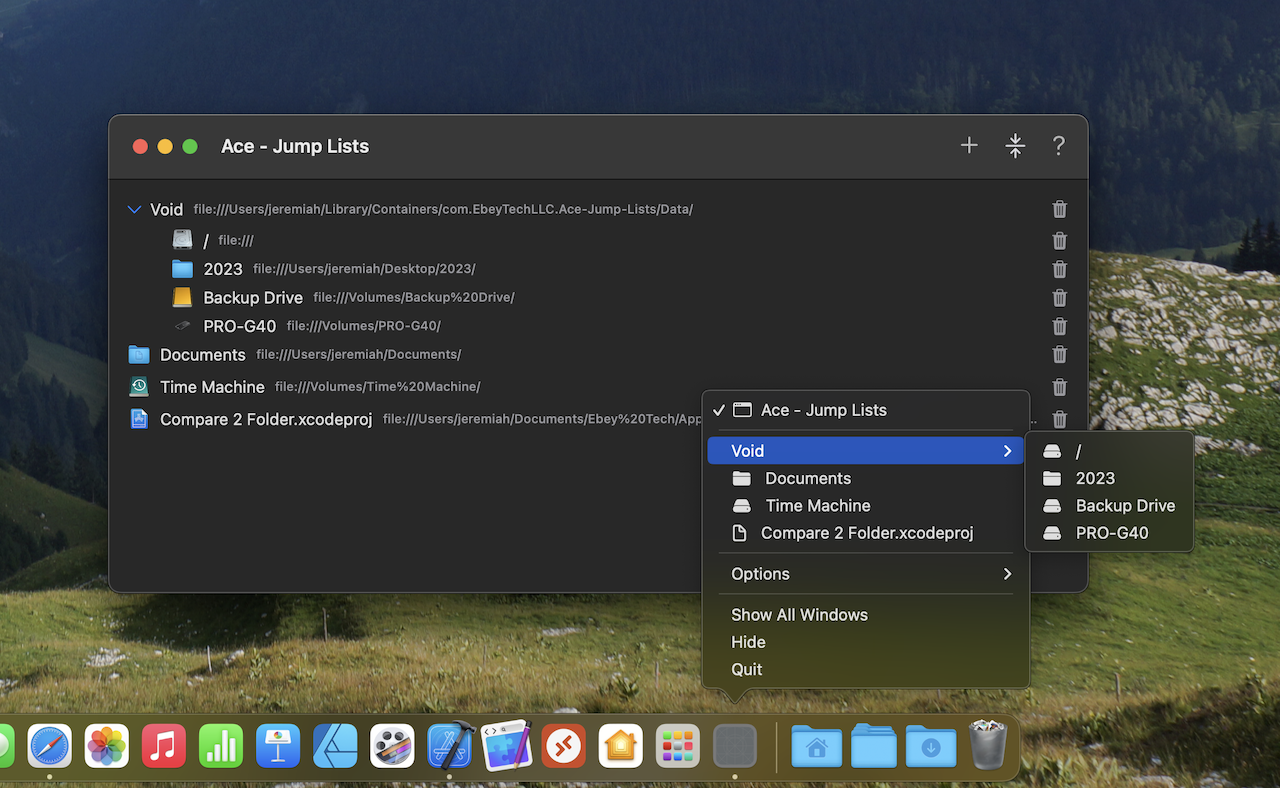
Create Custom Dock Menus Using Ace - Jump Lists for macOS
10/28/2023 Filed in: Ace - Jump Lists
Ace - Jump Lists gives users the power to create awesome easily accessible and FAST Dock Menus! Everyone agrees, the Dock Menu is the fastest way to access content on macOS systems, because the Dock is always there, but Dock Menus are dependent on recent files and folders that serve the app ONLY. Ace - Jump Lists changes that by allowing for customizable Dock Menus! Users can now place whatever Files, Folders, or even website URLs they want in the Dock Menu. This changes everything!
To utilize Ace - Jump Lists’ Dock Menu features, the Ace - Jump Lists app MUST be running. It CAN be minimized or hidden though, so it appears out of sight.
Click the '+' button to add a new Jump Item. Jump Items can be a Group, File/Folder, or a URL. If adding a Group, click Group, enter in a Group Name, then click Add button. If adding a File/Folder, click File/Folder, if you have already created a Group, you can select a 'Parent' (Group). This will nest your new File/Folder under that Group. If you've selected a Group and change your mind, click on Group or URL to clear the UI selections, then you can click File/Folder again and the Parent field should be cleared. To browser to a File/Folder, click 'Add' button. This will launch the macOS Finder File/Folder picker. Choose whatever items needed. You can also select multiple Files/Folders. Click 'Open' when complete. New items are added to the main view list.
Ace - Jump Lists supports drag/drop for Files and Folders from macOS Finder. Locate desired File/Folder, then drag to Ace - Jump Lists. Drop either over the blank UI canvas, or existing Files/Folders, or drop on top of a Group. Dropping over canvas or existing Files/Folders will place the content at the root level of the list. Dropping over a Group will nest the content under the Group.
Ace's primary mechanism to usefulness is the Dock menu. Any content built out (Groups, Files/Folders, URLs) will be ported automatically over to the Dock menu. Access the Dock menu by right-clicking the Ace app icon. There, all items mirroring the Ace main UI list will be present. You can click on whatever item you want to 'launch' the content.
In Ace's main view list, double-click a File/Folder/URL 'name' to launch the content. Clicking on the icon or path will NOT launch the content. From the Dock menu right-click app icon, click any item to launch the content. For Groups, hovering over the menu item will expand its list of children (if it has any).
From the main view list, right-click any item and choose 'Edit' menu item. This will launch the item's appropriate type editing view. For Groups, there will be the 'name' field. Type in appropriate name and click 'Done' button. If you want to revert to original value, use 'Edit / Undo Typing' (or CMD-Z shortcut). For editing File/Folder parents', the Editing view will show a list of available Groups. Select a Group or click the 'Clear Parent' to not nest item in a Group. URLs can be edited in the same manner, enter in a label and URL. URLs are NOT verified, so be sure to enter in valid website URLs.
Click the Delete Button (trash can icon) to remove a Jump Item. To bypass the Delete confirmation prompt - hold down the 'option' key and click Delete Button. Delete is also available from each Jump Items' right-click menu. Hold 'option' key while clicking that Delete menu will also bypass the Delete Confirmation prompt.
Ace - Jump Lists for macOS
10/06/2023 Filed in: Ace - Jump Lists
I am working on a dock menu builder app for macOS called Ace - Jump Lists. Ace allows users to build-out their own custom dock menu using the Ace UI. Files, folders, and URLs can be inserted into Ace, their names are then ported over to the dock menu. Additionally users can insert a "Group" element and nest files, folders, and URLs in them.