September 2023
The Keywords for macOS - Now Available!
09/26/2023 Filed in: The Keywords

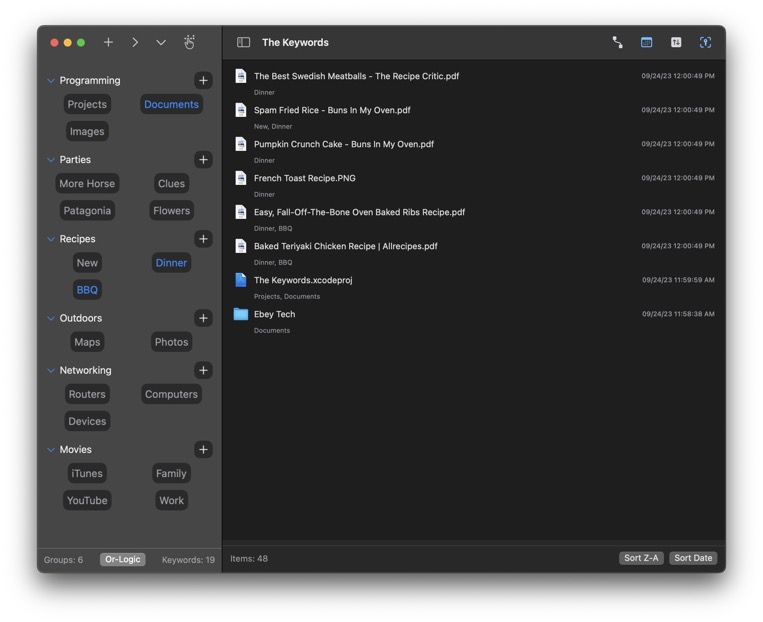
Use The Keywords app to assign keywords to files and folders. Utilize keywords to filter files & folders to access items fast and efficiently.
Click + button to create a new Tree Item. Click the Tree Item's + button to create new Keyword Items. In the navigation's toolbar, there are buttons for express operations, including Expand/Collapse Trees and Clear Keyword Selections. Tree Items can be Expanded/Collapse individually using the triangle next to them or by clicking the Tree Item Name. Tree Items have right-click options to Edit, Reorder, as well as some productivity buttons, for example turning the Group's Keywords on/off.
Keyword Items act like toggle button. Click them once to activate them. Click them again to de-activate them. Keyword Items have an important "key" feature for "Assigning Keywords" to a file/folder. A file/folder must be selected in the right-side Main View area before using the Assign Keywords functions. There are additional right-click features for Keyword Items too, like Clear Others - which de-activates other Keywords, and only activates the right-clicked Keyword.
Drag/drop file(s)/Folder(s) to the Main View (right-side area) to include files/folders in the app. Once a file/folder has been dropped and appears in the Main View, users can click to select it. To assign a Keyword to that File/Folder, with the file/folder selected, right-click a Keyword and choose "Assign Keywords". This links the Keyword to the selected file(s)/folder(s). After a Keyword has been assigned, clicking the Keyword would initiate the Main View to filter only files/folders that include the activated Keyword(s).
The Keywords app includes a toggle for filtering methods, referred to as "And-Logic" and "Or-Logic". And-Logic method would filter only files/folders that include ALL matching activated Keywords. Or-Logic method allows for filtering for ANY files/folders assigned to the activated Keywords.
For the Main View, along the top toolbar are optional toggles to hide/show file/folder properties, like Date Added and File Size. Date Added refers to the date of when the file/folder was dropped into The Keywords app. *Some files may not report a file size when read from the system. The macOS Finder may report the file's size, if true size is needed.
The Main View results can be sorted by Name or Date Added by clicking the Sort buttons along the bottom. The order can also be reversed by changing A-Z to Z-A.
The Keywords for macOS in Development
09/24/2023 Filed in: The Keywords
Working on a new macOS app called "The Keywords". This app allows users to drag/drop files/folders into the app and assign Keywords to them. Users can then use the keywords to filter specifically for target file/folder and then launch the item accordingly. Still doing some testing with the app to verify proper app operation. Also brainstorming some other similar keyword-based apps that focus on user productivity. Also considering porting The Keywords app to Windows.
macOS Media Player App - Media Slide Blog
09/07/2023 Filed in: Media Slide
Media Slide is a great way to skim through an array of media files. Media files can be images, videos, music, or audio format.
Click the 'Choose Media Directory' button in toolbar to locate a directory containing media files (images, videos, audio). Typical image formats like png and jpg are supported. Typical video formats like mov and mp4 are supported. Typical audio files like mp3 and m4a are supported. If Quick Look can see/play it, it'll likely work. Media will be loaded into a background collection and default to showing the first media item from list. Media items in collection will be listed in alphabetical order.
Use the 'Clear App Data' button to remove the media directory reference from Media Slide app. Clear App Data doesn't affect any files stored on computer. Media Slide uses the Entitlement 'Access User Selected Files (Read Only)' - meaning it can't change any computer file data.
Use the Slider along the bottom to drag left/right. Moving the slider will switch between media files from the chosen directory. The Slider will only be visible if there are two or more media items. Optionally the left/right arrows in the bottom left corner can also be used to switch between media items. Those buttons also have a keyboard shortcut (left/right arrows respectively).
Along the bottom of the UI will show the selected media file name. Hovering above the media file name with the mouse cursor will show a tooltip of the media file path. To the bottom right corner lists the media directory count.
Right-click the media item's name and choose 'Show in Finder' to open the macOS Finder to the selected media item's directory.
macOS Music Player App - Audio Slide Blog
09/02/2023 Filed in: Audio Slide
Audio Slide is a great way to skim through an array of audio files and playback music, audio recordings, or sound effects.
Click the 'Choose Audio Directory' button in toolbar to locate a directory containing audio files. Typical audio files like mp3 and m4a are supported. If Quick Look can play it, it'll likely work. Audio will be loaded into a background collection and default to showing the first audio item from list. Audio items in collection will be listed in alphabetical order.
Use the 'Clear App Data' button to remove the audio directory reference from Audio Slide app. Clear App Data doesn't affect any files stored on computer.
Use the Slider along the bottom to drag left/right. Moving the slider will switch between audio files from the chosen directory. Slider will only be visible if there are two or more audio items.
Along the bottom of the UI will show the selected audio file name. Hovering above the audio file's name with the mouse cursor will show a tooltip of the audio file path. To the bottom right corner lists the audio directory count.
Right-click the audio item's name and choose 'Show in Finder' to open the macOS Finder to the selected audio item's directory.
Windows Recent Items App Blog
09/02/2023 Filed in: Recent Items

Recent Items offers a great way to see your Windows system built-in recent list for files and folders.
During Startup, Recent Items will read the user name currently logged in, then it'll append the standard Windows OS Recent directory path to the user name. This directory is where the Recent Items app pulls in .lnk files. It will then read and organize the .lnk file sources into Tree Items, based on Date Range groups. Shortcut files linking to server directories, like paths starting with '\\' are skipped. This is due to performance purposes. Reading from network sources drastically slows down recent file enumeration.
Click the Refresh button to clear the date range category lists and to reload content from the Recent directory. Pinned items are not reloaded, but will refresh any 'Write Time' values.
Recent items are categoried into multiple Date Ranges to provide an excellent recent file/folder experience. These Tree Items can be expanded/collapsed by click triangle icons, or by clicking Tree Item row (e.g. The Tree Item Name). Various right-click functions are available for Tree Items. The mainly provide batch operations for the Tree Items.
Files and folders work much like they would in File Explorer. Double-click to Open item. Right-click options to Recycle the source file/folder or to Delete the shortcut that appears in the user's Recent directory.
Click the Filter by Name field once to invoke the Filter History pop-up. Click the field again to change focus to the Filter field. Type in text into the Filter by Name field to dynamically filter Tree Items' content below. After about 4 seconds, any text in the Filter field will be added to the Filter History collection. Double-click a Filter History item to re-enter the text into the Filter field. Click the Clear button to clear all Filter History.
Use the provided built-in Filter icons in the toolbar to dynamically filter Link items below, based on item type. Right-click icons for additional batch operations (e.g. All On).
Toggle the Refresh Timer to have the Recent Items app attempt to dynamically update content in the Tree Item lists. Updates like date and assigned Date Range category will be processed.
Toggle the Delete Old button to choose to have Recent Items app attempt to purge the user's Recent directory of any shortcuts older than 1-year. This only affects shortcuts in the Recent directory and not their source content.